Sizing Paper with Rabbit Skin Glue
|
This is a demonstration of how I would prepare paper for oil paints using rabbit skin glue as a sizing liquid. I’ve always used a 10:1 ratio myself (10 parts water to 1 part glue,) but had read elsewhere that I could get the same protection with a 20:1 proportion, so I wanted to test that out. My preferred sizing for paper, which I’ve written about before, is actually shellac, but hide glue can work well also.
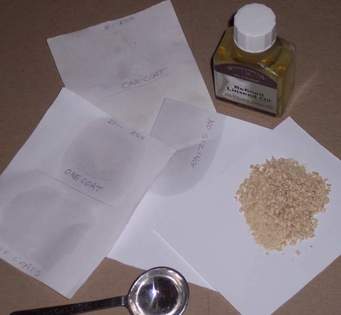
The dry glue I’m using came in pellets, so I ground it down some in a blender to make it easier to dissolve. To make the powder into a liquid, I mix in the ratio I need in a glass jar, stir for a couple minutes, and let that sit at room temperature (@70° F) for about 4 hours. I then set the jar in a pot on the stove filled with hot water. With a thermometer placed in the glue liquid, I heat the water to about 130° F. I then apply a coat of sizing using a sponge brush on one side of the paper, hold it up and wipe off the excess from the bottom. Next I apply a coat to the back which will even out the stress from the shrinkage. On the bottom half of the paper I applied two coats in the same manner after the first coat had dried for an hour.

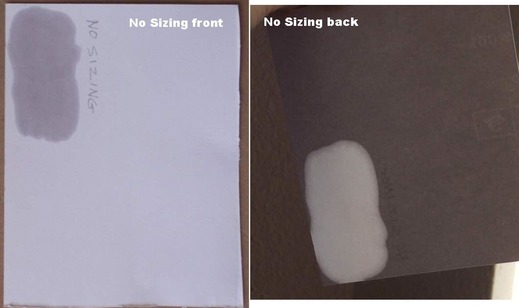
For this example I’m using a small piece of 100% cotton rag paper that is very light weight (32lb.) so that any oil penetration can be easily seen on the reverse side. This letter-sized sheet of paper was cut into three pieces, one piece unsized, another sized 10:1, and a third piece at 20:1. The oil I’m using is Winsor & Newton’s refined linseed oil. Glue powder has a bloom gel strength rating from 80 to 500, and this batch is rated at 192, which is a common type. In this first set of pictures you can see the raw untreated paper held up to a window. Not only has the oil quickly penetrated to the back, it has made the paper nearly transparent.
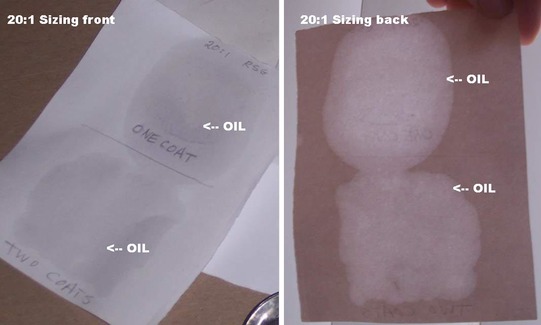
Below, the 20:1 sample is shown. On the top half is a single coat and two coats on the bottom. The oil can be seen to completely penetrate to such a degree that the sizing has no effect.
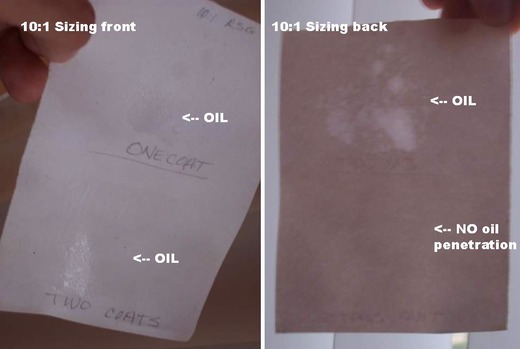
Using a 10:1 mixture in the example below there still appears to be some spots of oil coming through on the top half that used just one coat. The bottom with two coats, however, shows no oil penetration, so that is the mixture I use to protect paper from the oil. It’s also what I use to size raw canvas. It’s possible this strength of glue might work if diluted at @ 15:1 or a higher bloom strength glue at 20:1. The only advantage there would be getting more liquid from the same amount of glue. One tablespoon of glue to ten of water gives me about 4 ounces of solution.
Notes:
I hang the paper to dry for several hours until the water has completely evaporated before I start painting on it. If the paper is thin enough to wrinkle, I can “stretch” it (tape it) to a firm board and that will pull it tight when it dries. When using thick 300-lb. watercolor paper that’s usually not necessary. A half-teaspoon of alum powder can be added to the heated solution to help strengthen the glue surface and make it more moisture resistant. It takes awhile for the water bath to cool so I can coat quite a bit of paper before it needs reheating (keep above @110° F.) A portable hot plate that has a low setting could be used to keep the heat constant, but make sure the glue doesn’t go over 150° F. Hide glue spoils so keep any remaining liquid in the refrigerator, but only for a few days. Better still, use up what you make on extra paper sheets or raw canvas and don’t bother saving it. If necessary, you can dilute it down just by adding more water. The ratio I use for gesso is 14:1. A ratio of 1.5:1 makes very strong wood adhesive and is good for frame building. |
