Make Your Own Transfer Paper
This is a brief article about the procedure for making your own transfer paper. It will allow you to transfer a drawing on the front of the paper to another surface, like carbon paper, but without the issues that carbon or graphite present. Instead of carbon powder I use pigment, which is more compatible with the paints I use. You can use charcoal or graphite if you wish.
First, for those of you are unfamiliar with how transfer paper works, it is a thin sheet of paper with a coating on the back that allows you to trace over your drawing, and that will transfer those marks to another surface, such as canvas or paper. The coating in commercial transfer papers is typically graphite. You could also quickly make your own by turning your drawing over and just drawing over the back with charcoal or graphite, but this method is less messy than that and more versatile.
The issue with graphite or charcoal is their micro slivers of carbon can migrate up through the paint itself over time, also their dark value can be difficult to cover with lean layers of paint, or lighter value pigments that are transparent. What this method allows you to do is make transfer paper using regular pigment of your own choosing rather than graphite. It doesn't have to be black; even white pigment will work. It does involve the use of turpentine, so if that substance bothers you, bear that in mind, and also use proper ventilation.
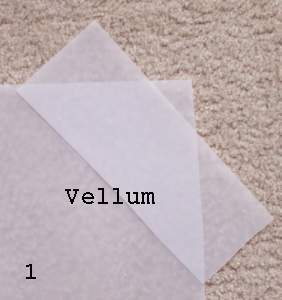
The type of paper I choose is vellum drawing paper, which is a somewhat translucent and stiff tracing paper available in sheets pads or rolls. I stir together small amounts of pigment and a few drops of turpentine until I get a thin wash. After making a drawing on the front of the vellum that I want to transfer, I turn it over and paint on my pigment and turpentine mixture. I don't need to paint the whole back area, just the lines of the drawing that I'm transferring, which is why I use vellum so I can see through it easily. When transferring the drawing, I like using a colored pencil to trace over the lines so I can see where I've already marked.
Turpentine is all that's necessary to work as the binder. It's just strong enough to hold the pigment but not too strong to prevent transfer. Keep in mind that turpentine isn't going to "fix" these marks you make. They can still be lifted or erased (or smeared) unless you spray a fixative on them, just like you would do if using commercial transfer paper.
First, for those of you are unfamiliar with how transfer paper works, it is a thin sheet of paper with a coating on the back that allows you to trace over your drawing, and that will transfer those marks to another surface, such as canvas or paper. The coating in commercial transfer papers is typically graphite. You could also quickly make your own by turning your drawing over and just drawing over the back with charcoal or graphite, but this method is less messy than that and more versatile.
The issue with graphite or charcoal is their micro slivers of carbon can migrate up through the paint itself over time, also their dark value can be difficult to cover with lean layers of paint, or lighter value pigments that are transparent. What this method allows you to do is make transfer paper using regular pigment of your own choosing rather than graphite. It doesn't have to be black; even white pigment will work. It does involve the use of turpentine, so if that substance bothers you, bear that in mind, and also use proper ventilation.
The type of paper I choose is vellum drawing paper, which is a somewhat translucent and stiff tracing paper available in sheets pads or rolls. I stir together small amounts of pigment and a few drops of turpentine until I get a thin wash. After making a drawing on the front of the vellum that I want to transfer, I turn it over and paint on my pigment and turpentine mixture. I don't need to paint the whole back area, just the lines of the drawing that I'm transferring, which is why I use vellum so I can see through it easily. When transferring the drawing, I like using a colored pencil to trace over the lines so I can see where I've already marked.
Turpentine is all that's necessary to work as the binder. It's just strong enough to hold the pigment but not too strong to prevent transfer. Keep in mind that turpentine isn't going to "fix" these marks you make. They can still be lifted or erased (or smeared) unless you spray a fixative on them, just like you would do if using commercial transfer paper.
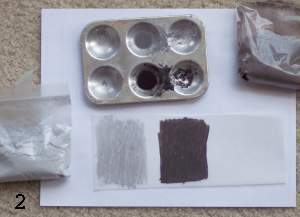
Below you can see a small piece of the vellum with pigment painted on to it using a turpentine wash. I'm using both dark brown and gray pigments for this example.
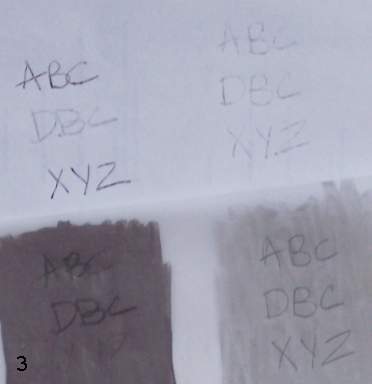
Below is a closeup of lettering marks on the back of the painted vellum piece above. You can see how the marks are transferred onto another sheet of paper. The "DBC" lettering on the left was made using a soft lead (HB) which in turn makes a lighter mark than a hard lead pencil (5H) which was used on all the other letters. With the gray pigment, all the marks are about the same value no matter how hard I press or what type of lead I use.
Try this with different pigment colors. You can find pigment at many art or hobby stores. Candle making stores or ceramic supply stores also carry them. If you have soft pastels, you could collect the excess powder and use that as well.
